39 | 管道:项目组A完成了,如何交接给项目组B?
在这一章的第一节里,我们大致讲了管道的使用方式以及相应的命令行。这一节,我们就具体来看一下管道是如何实现的。
我们先来看,我们常用的匿名管道(Anonymous Pipes),也即将多个命令串起来的竖线,背后的原理到底是什么。
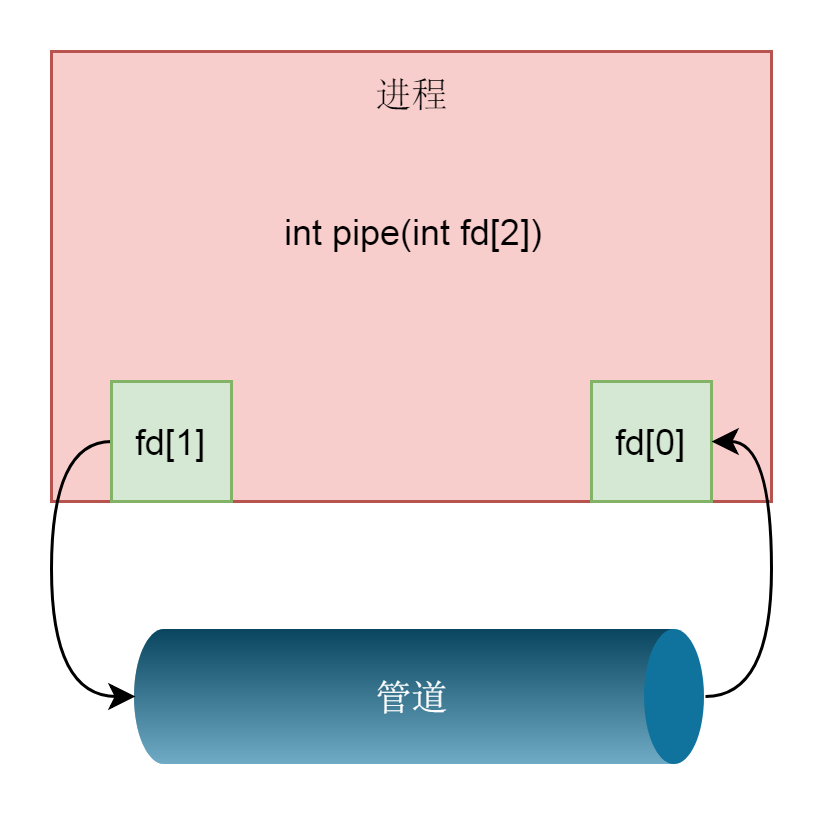
上次我们说,它是基于管道的,那管道如何创建呢?管道的创建,需要通过下面这个系统调用。
int pipe(int fd[2])
在这里,我们创建了一个管道pipe,返回了两个文件描述符,这表示管道的两端,一个是管道的读取端描述符fd[0],另一个是管道的写入端描述符fd[1]。
我们来看在内核里面是如何实现的。
SYSCALL_DEFINE1(pipe, int __user *, fildes){return sys_pipe2(fildes, 0);}SYSCALL_DEFINE2(pipe2, int __user *, fildes, int, flags){struct file *files[2];int fd[2];int error;error = __do_pipe_flags(fd, files, flags);if (!error) {if (unlikely(copy_to_user(fildes, fd, sizeof(fd)))) {......error = -EFAULT;} else {fd_install(fd[0], files[0]);fd_install(fd[1], files[1]);}}return error;}
在内核中,主要的逻辑在pipe2系统调用中。这里面要创建一个数组files,用来存放管道的两端的打开文件,另一个数组fd存放管道的两端的文件描述符。如果调用__do_pipe_flags没有错误,那就调用fd_install,将两个fd和两个struct file关联起来。这一点和打开一个文件的过程很像了。
我们来看__do_pipe_flags。这里面调用了create_pipe_files,然后生成了两个fd。从这里可以看出,fd[0]是用于读的,fd[1]是用于写的。
static int __do_pipe_flags(int *fd, struct file **files, int flags){int error;int fdw, fdr;......error = create_pipe_files(files, flags);......error = get_unused_fd_flags(flags);......fdr = error;error = get_unused_fd_flags(flags);......fdw = error;fd[0] = fdr;fd[1] = fdw;return 0;......}
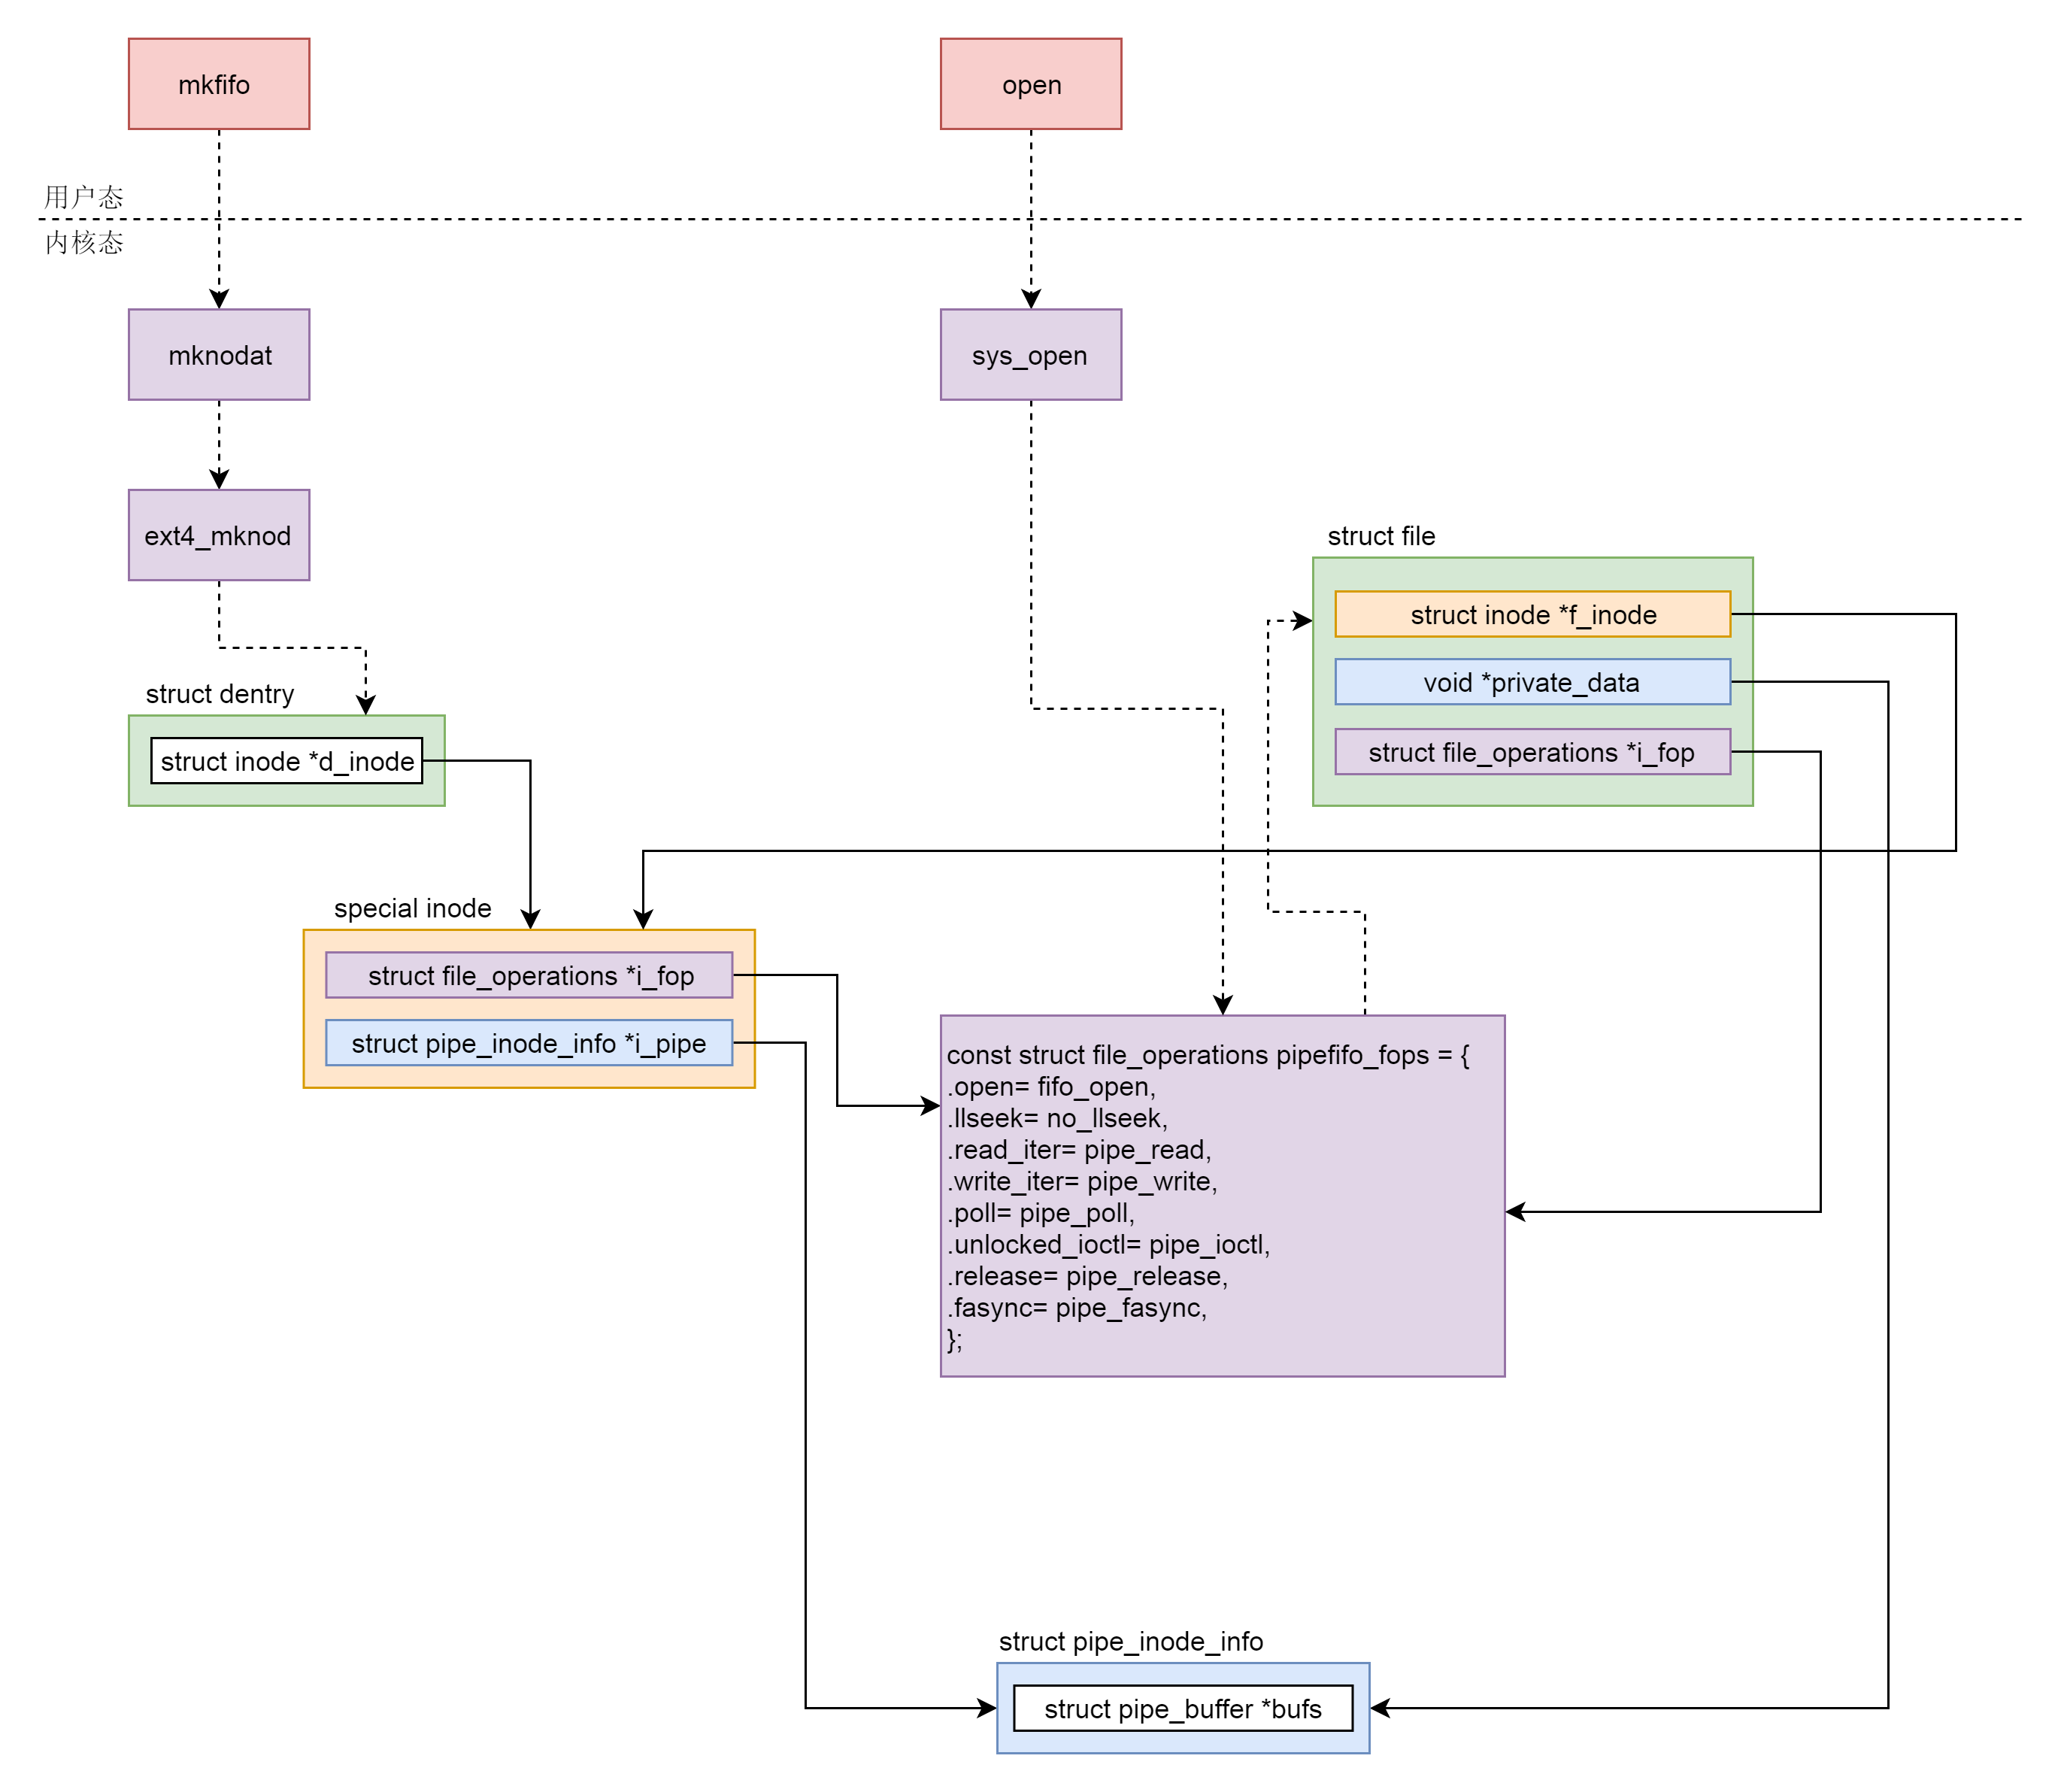
创建一个管道,大部分的逻辑其实都是在create_pipe_files函数里面实现的。这一章第一节的时候,我们说过,命名管道是创建在文件系统上的。从这里我们可以看出,匿名管道,也是创建在文件系统上的,只不过是一种特殊的文件系统,创建一个特殊的文件,对应一个特殊的inode,就是这里面的get_pipe_inode。
int create_pipe_files(struct file **res, int flags){int err;struct inode *inode = get_pipe_inode();struct file *f;struct path path;......path.dentry = d_alloc_pseudo(pipe_mnt->mnt_sb, &empty_name);......path.mnt = mntget(pipe_mnt);d_instantiate(path.dentry, inode);f = alloc_file(&path, FMODE_WRITE, &pipefifo_fops);......f->f_flags = O_WRONLY | (flags & (O_NONBLOCK | O_DIRECT));f->private_data = inode->i_pipe;res[0] = alloc_file(&path, FMODE_READ, &pipefifo_fops);......path_get(&path);res[0]->private_data = inode->i_pipe;res[0]->f_flags = O_RDONLY | (flags & O_NONBLOCK);res[1] = f;return 0;......}
从get_pipe_inode的实现,我们可以看出,匿名管道来自一个特殊的文件系统pipefs。这个文件系统被挂载后,我们就得到了struct vfsmount *pipe_mnt。然后挂载的文件系统的superblock就变成了:pipe_mnt->mnt_sb。如果你对文件系统的操作还不熟悉,要返回去复习一下文件系统那一章啊。
static struct file_system_type pipe_fs_type = {.name = "pipefs",.mount = pipefs_mount,.kill_sb = kill_anon_super,};static int __init init_pipe_fs(void){int err = register_filesystem(&pipe_fs_type);if (!err) {pipe_mnt = kern_mount(&pipe_fs_type);}......}static struct inode * get_pipe_inode(void){struct inode *inode = new_inode_pseudo(pipe_mnt->mnt_sb);struct pipe_inode_info *pipe;......inode->i_ino = get_next_ino();pipe = alloc_pipe_info();......inode->i_pipe = pipe;pipe->files = 2;pipe->readers = pipe->writers = 1;inode->i_fop = &pipefifo_fops;inode->i_state = I_DIRTY;inode->i_mode = S_IFIFO | S_IRUSR | S_IWUSR;inode->i_uid = current_fsuid();inode->i_gid = current_fsgid();inode->i_atime = inode->i_mtime = inode->i_ctime = current_time(inode);return inode;......}
我们从new_inode_pseudo函数创建一个inode。这里面开始填写Inode的成员,这里和文件系统的很像。这里值得注意的是struct pipe_inode_info,这个结构里面有个成员是struct pipe_buffer *bufs。我们可以知道,所谓的匿名管道,其实就是内核里面的一串缓存。
另外一个需要注意的是pipefifo_fops,将来我们对于文件描述符的操作,在内核里面都是对应这里面的操作。
const struct file_operations pipefifo_fops = {.open = fifo_open,.llseek = no_llseek,.read_iter = pipe_read,.write_iter = pipe_write,.poll = pipe_poll,.unlocked_ioctl = pipe_ioctl,.release = pipe_release,.fasync = pipe_fasync,};
我们回到create_pipe_files函数,创建完了inode,还需创建一个dentry和他对应。dentry和inode对应好了,我们就要开始创建struct file对象了。先创建用于写入的,对应的操作为pipefifo_fops;再创建读取的,对应的操作也为pipefifo_fops。然后把private_data设置为pipe_inode_info。这样从struct file这个层级上,就能直接操作底层的读写操作。
至此,一个匿名管道就创建成功了。如果对于fd[1]写入,调用的是pipe_write,向pipe_buffer里面写入数据;如果对于fd[0]的读入,调用的是pipe_read,也就是从pipe_buffer里面读取数据。
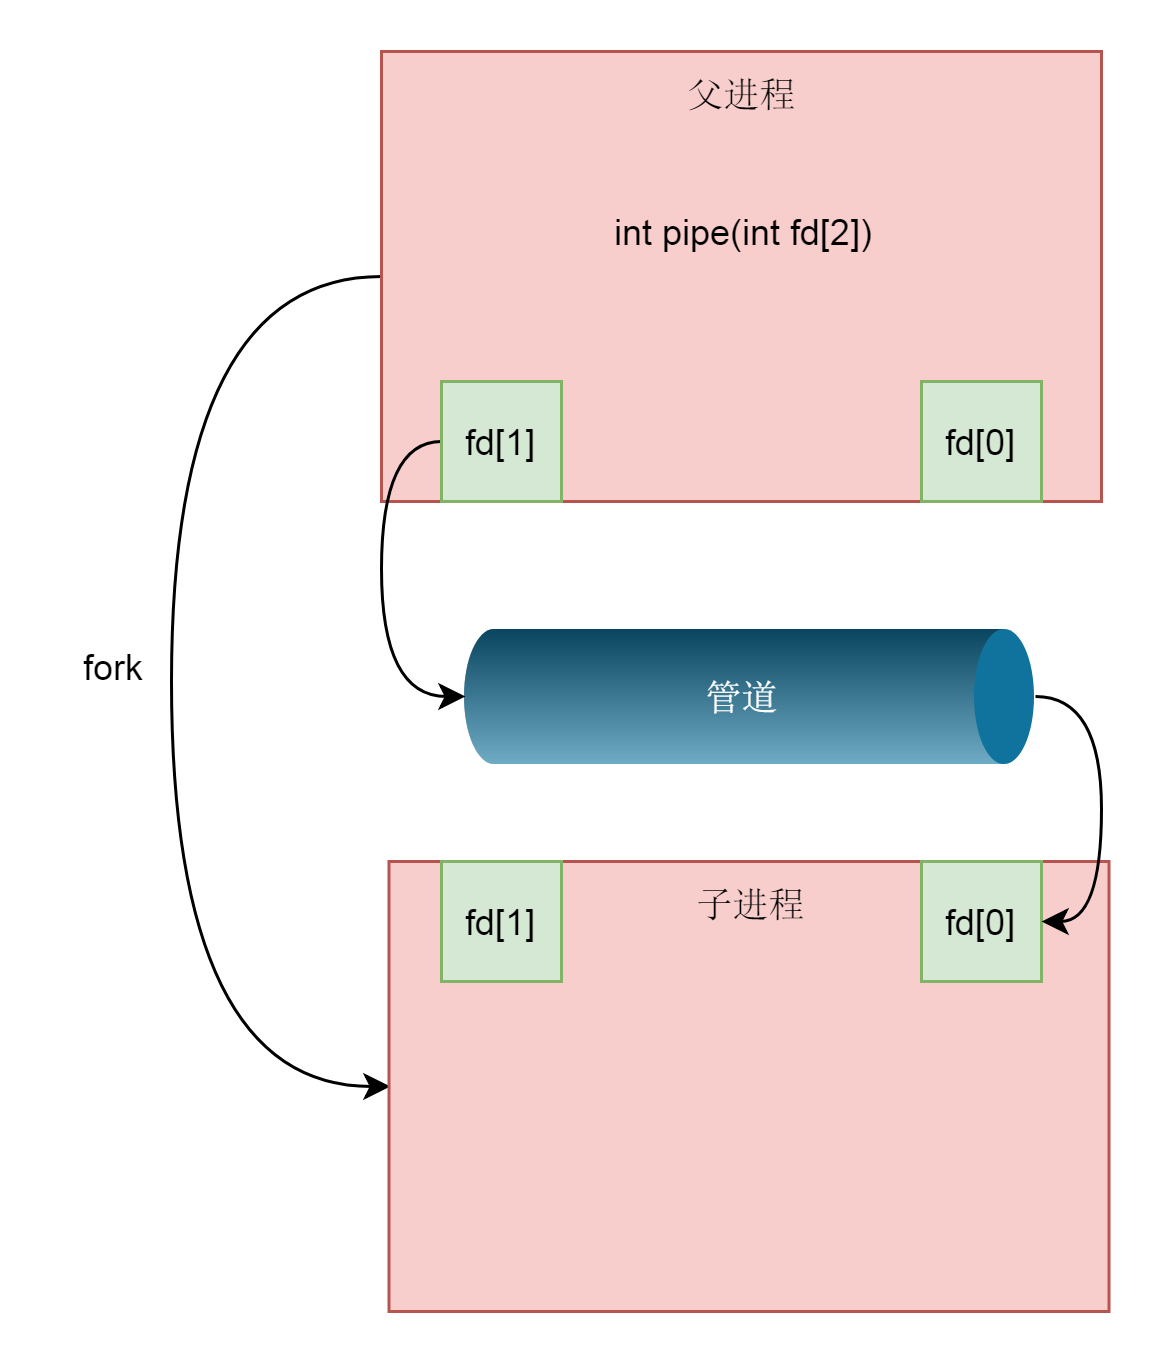
但是这个时候,两个文件描述符都是在一个进程里面的,并没有起到进程间通信的作用,怎么样才能使得管道是跨两个进程的呢?还记得创建进程调用的fork吗?在这里面,创建的子进程会复制父进程的struct files_struct,在这里面fd的数组会复制一份,但是fd指向的struct file对于同一个文件还是只有一份,这样就做到了,两个进程各有两个fd指向同一个struct file的模式,两个进程就可以通过各自的fd写入和读取同一个管道文件实现跨进程通信了。
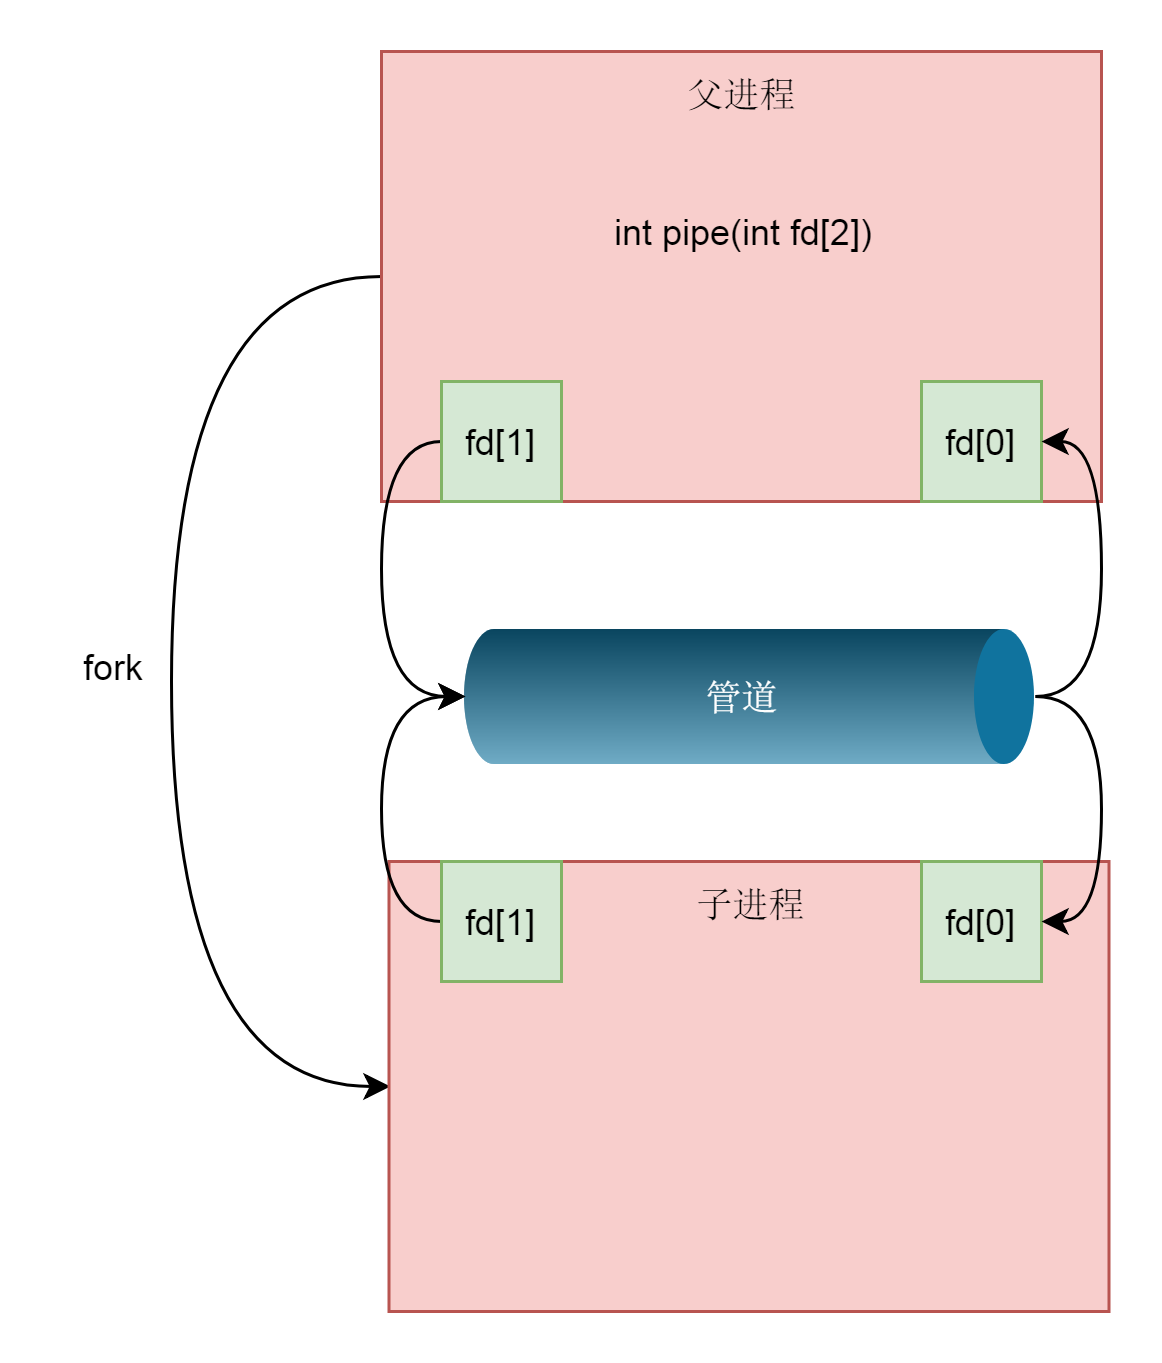
由于管道只能一端写入,另一端读出,所以上面的这种模式会造成混乱,因为父进程和子进程都可以写入,也都可以读出,通常的方法是父进程关闭读取的fd,只保留写入的fd,而子进程关闭写入的fd,只保留读取的fd,如果需要双向通行,则应该创建两个管道。
一个典型的使用管道在父子进程之间的通信代码如下:
#include <unistd.h>#include <fcntl.h>#include <stdlib.h>#include <stdio.h>#include <errno.h>#include <string.h>int main(int argc, char *argv[]){int fds[2];if (pipe(fds) == -1)perror("pipe error");pid_t pid;pid = fork();if (pid == -1)perror("fork error");if (pid == 0){close(fds[0]);char msg[] = "hello world";write(fds[1], msg, strlen(msg) + 1);close(fds[1]);exit(0);} else {close(fds[1]);char msg[128];read(fds[0], msg, 128);close(fds[0]);printf("message : %s\n", msg);return 0;}}
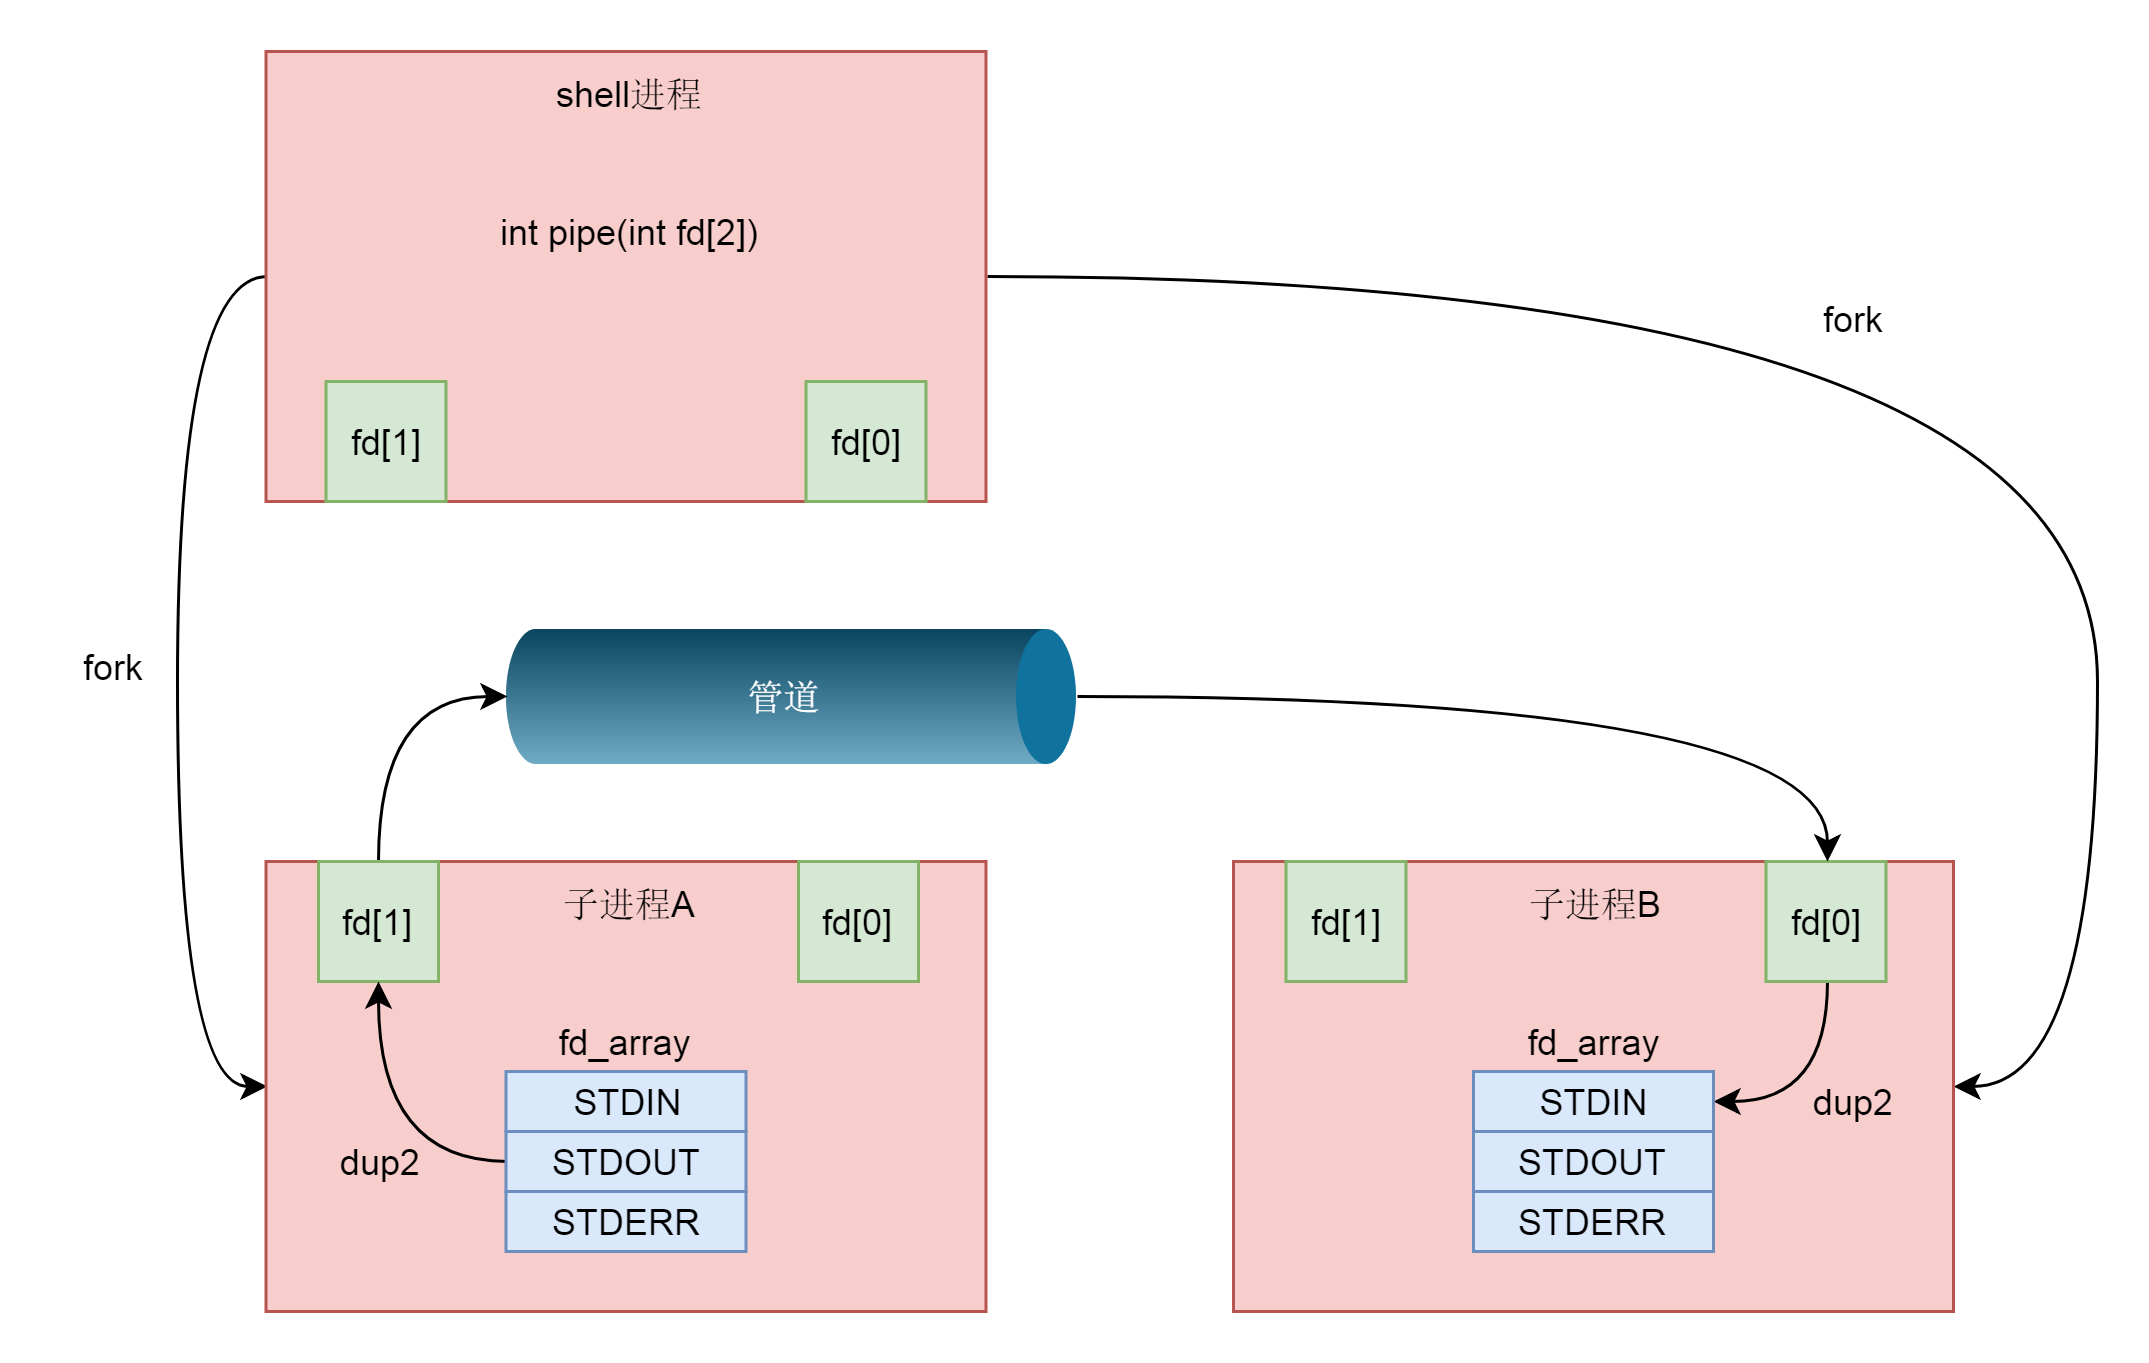
到这里,我们仅仅解析了使用管道进行父子进程之间的通信,但是我们在shell里面的不是这样的。在shell里面运行A|B的时候,A进程和B进程都是shell创建出来的子进程,A和B之间不存在父子关系。
不过,有了上面父子进程之间的管道这个基础,实现A和B之间的管道就方便多了。
我们首先从shell创建子进程A,然后在shell和A之间建立一个管道,其中shell保留读取端,A进程保留写入端,然后shell再创建子进程B。这又是一次fork,所以,shell里面保留的读取端的fd也被复制到了子进程B里面。这个时候,相当于shell和B都保留读取端,只要shell主动关闭读取端,就变成了一管道,写入端在A进程,读取端在B进程。
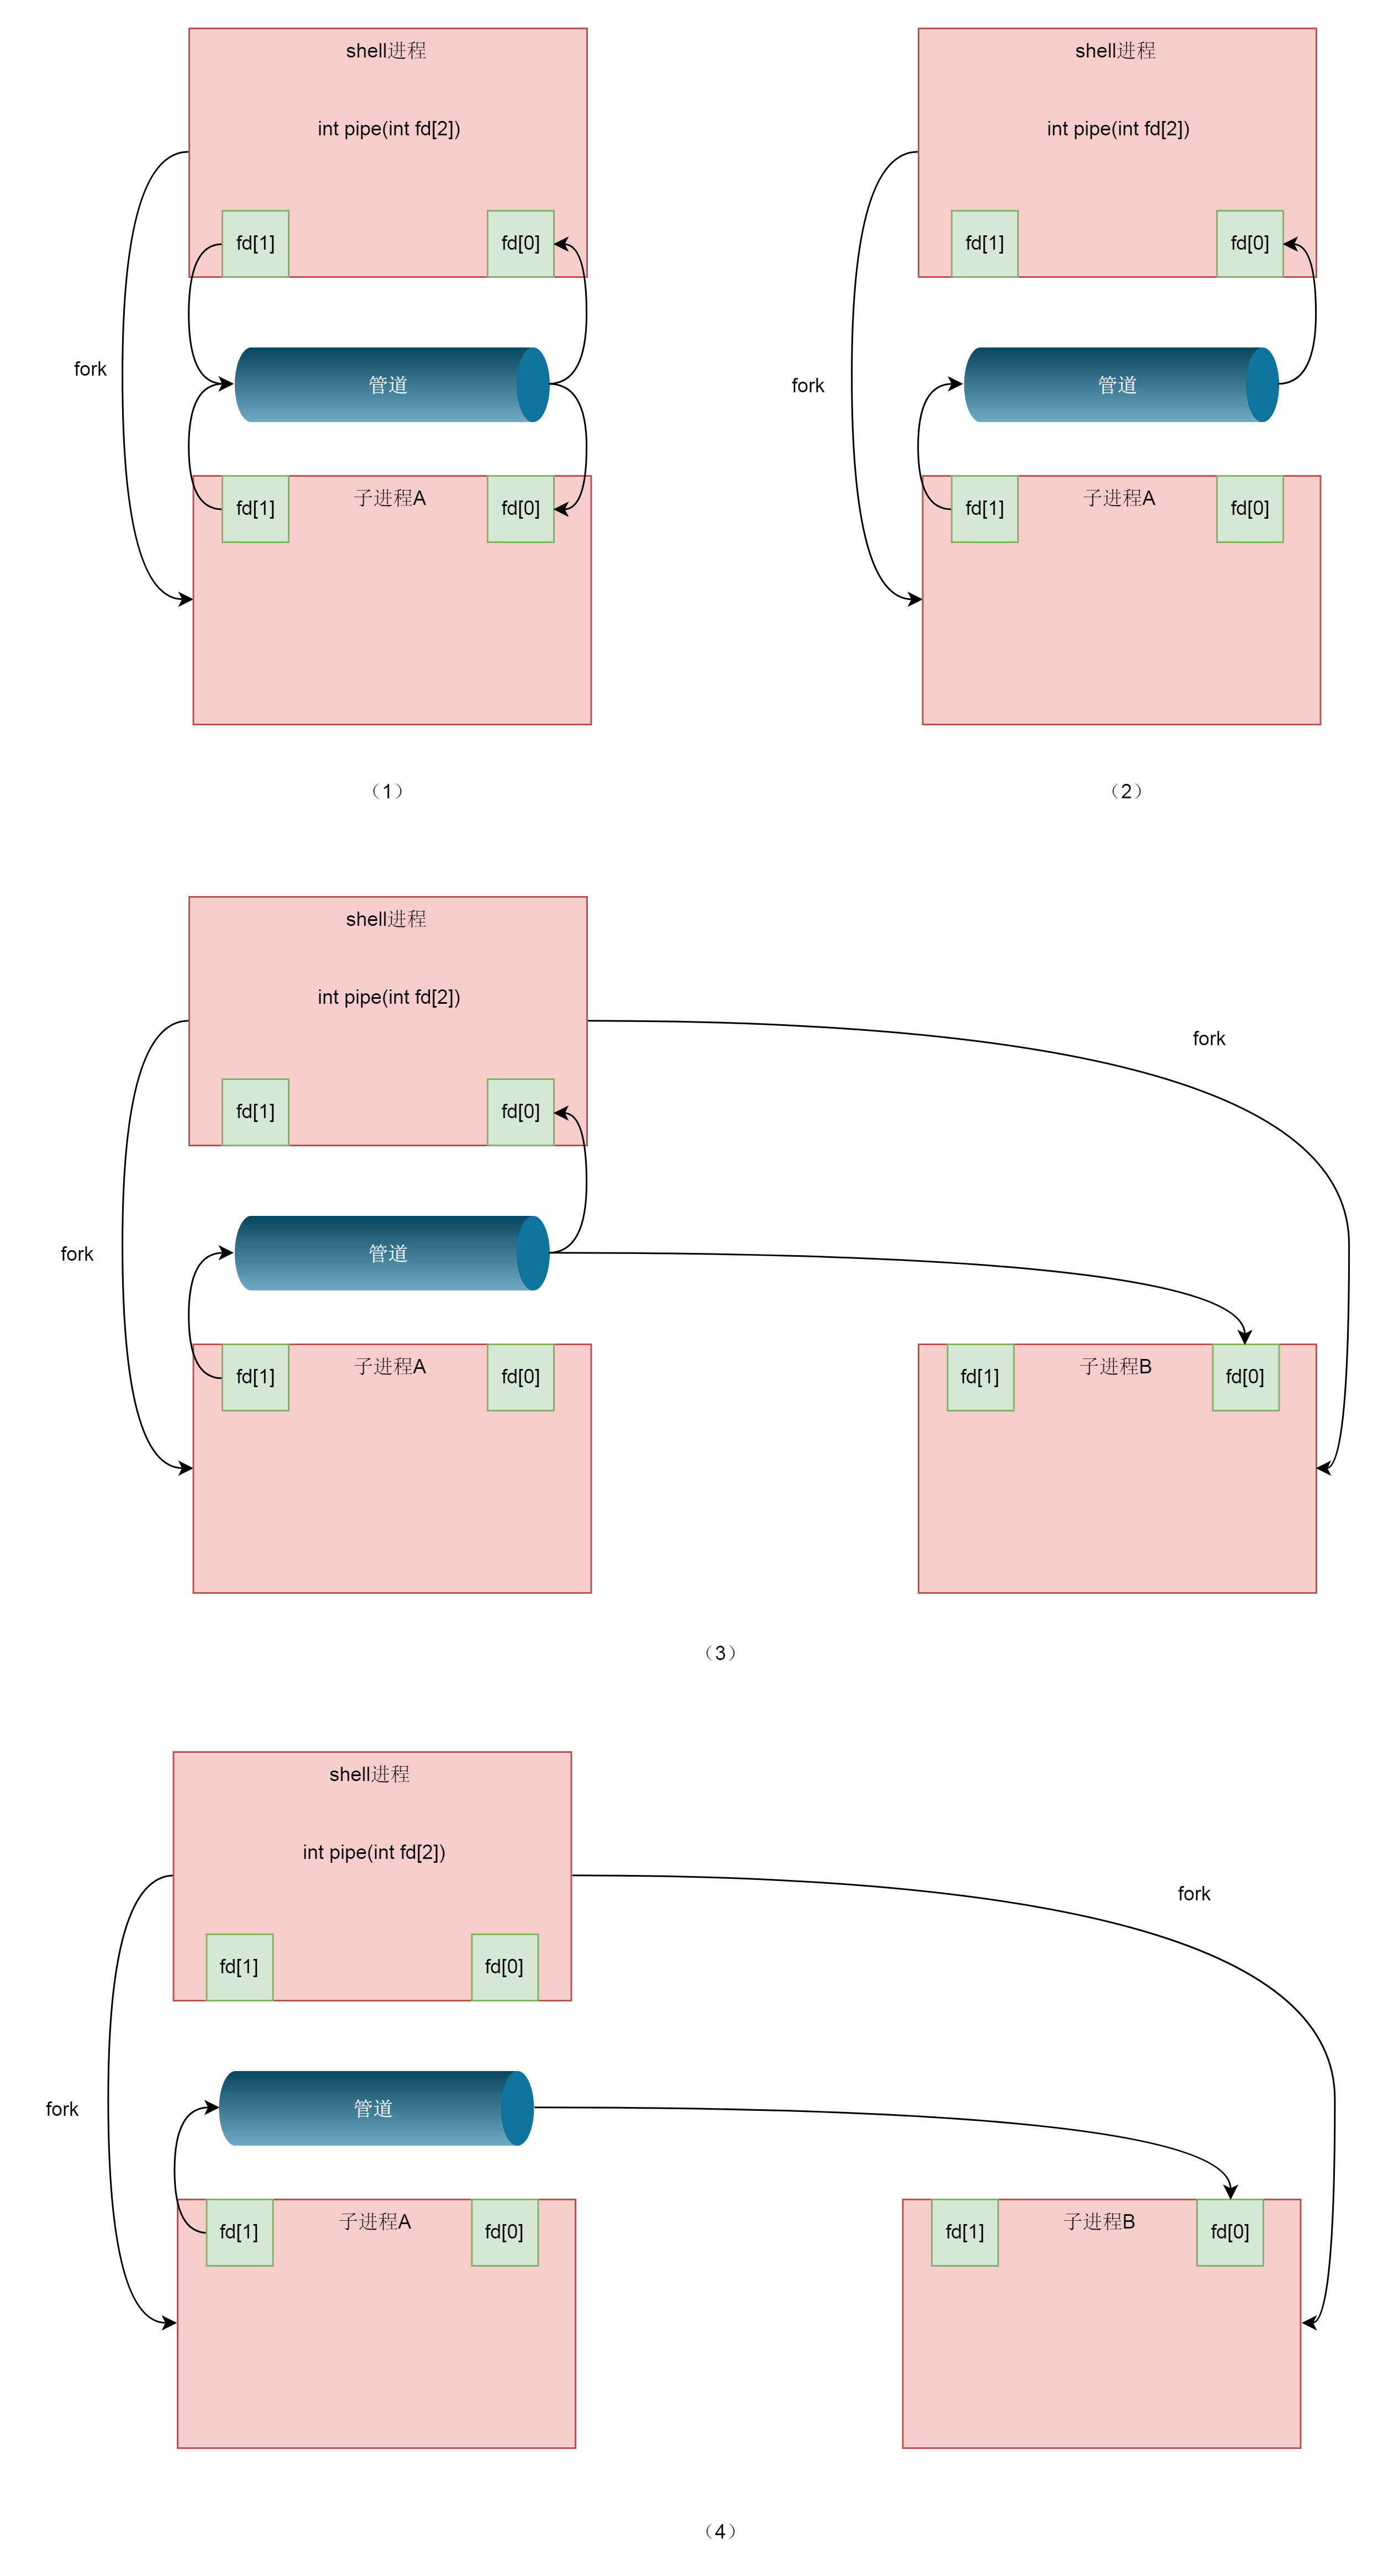
接下来我们要做的事情就是,将这个管道的两端和输入输出关联起来。这就要用到dup2系统调用了。
int dup2(int oldfd, int newfd);
这个系统调用,将老的文件描述符赋值给新的文件描述符,让newfd的值和oldfd一样。
我们还是回忆一下,在files_struct里面,有这样一个表,下标是fd,内容指向一个打开的文件struct file。
struct files_struct {struct file __rcu * fd_array[NR_OPEN_DEFAULT];}
在这个表里面,前三项是定下来的,其中第零项STDIN_FILENO表示标准输入,第一项STDOUT_FILENO表示标准输出,第三项STDERR_FILENO表示错误输出。
在A进程中,写入端可以做这样的操作:dup2(fd[1],STDOUT_FILENO),将STDOUT_FILENO(也即第一项)不再指向标准输出,而是指向创建的管道文件,那么以后往标准输出写入的任何东西,都会写入管道文件。
在B进程中,读取端可以做这样的操作,dup2(fd[0],STDIN_FILENO),将STDIN_FILENO也即第零项不再指向标准输入,而是指向创建的管道文件,那么以后从标准输入读取的任何东西,都来自于管道文件。
至此,我们才将A|B的功能完成。
为了模拟A|B的情况,我们可以将前面的那一段代码,进一步修改成下面这样:
#include <unistd.h>#include <fcntl.h>#include <stdlib.h>#include <stdio.h>#include <errno.h>#include <string.h>int main(int argc, char *argv[]){int fds[2];if (pipe(fds) == -1)perror("pipe error");pid_t pid;pid = fork();if (pid == -1)perror("fork error");if (pid == 0){dup2(fds[1], STDOUT_FILENO);close(fds[1]);close(fds[0]);execlp("ps", "ps", "-ef", NULL);} else {dup2(fds[0], STDIN_FILENO);close(fds[0]);close(fds[1]);execlp("grep", "grep", "systemd", NULL);}return 0;}
接下来,我们来看命名管道。我们在讲命令的时候讲过,命名管道需要事先通过命令mkfifo,进行创建。如果是通过代码创建命名管道,也有一个函数,但是这不是一个系统调用,而是Glibc提供的函数。它的定义如下:
intmkfifo (const char *path, mode_t mode){dev_t dev = 0;return __xmknod (_MKNOD_VER, path, mode | S_IFIFO, &dev);}int__xmknod (int vers, const char *path, mode_t mode, dev_t *dev){unsigned long long int k_dev;....../* We must convert the value to dev_t type used by the kernel. */k_dev = (*dev) & ((1ULL << 32) - 1);......return INLINE_SYSCALL (mknodat, 4, AT_FDCWD, path, mode,(unsigned int) k_dev);}
Glibc的mkfifo函数会调用mknodat系统调用,还记得咱们学字符设备的时候,创建一个字符设备的时候,也是调用的mknod。这里命名管道也是一个设备,因而我们也用mknod。
SYSCALL_DEFINE4(mknodat, int, dfd, const char __user *, filename, umode_t, mode, unsigned, dev){struct dentry *dentry;struct path path;unsigned int lookup_flags = 0;......retry:dentry = user_path_create(dfd, filename, &path, lookup_flags);......switch (mode & S_IFMT) {......case S_IFIFO: case S_IFSOCK:error = vfs_mknod(path.dentry->d_inode,dentry,mode,0);break;}......}
对于mknod的解析,我们在字符设备那一节已经解析过了,先是通过user_path_create对于这个管道文件创建一个dentry,然后因为是S_IFIFO,所以调用vfs_mknod。由于这个管道文件是创建在一个普通文件系统上的,假设是在ext4文件上,于是vfs_mknod会调用ext4_dir_inode_operations的mknod,也即会调用ext4_mknod。
const struct inode_operations ext4_dir_inode_operations = {.......mknod = ext4_mknod,......};static int ext4_mknod(struct inode *dir, struct dentry *dentry,umode_t mode, dev_t rdev){handle_t *handle;struct inode *inode;......inode = ext4_new_inode_start_handle(dir, mode, &dentry->d_name, 0,NULL, EXT4_HT_DIR, credits);handle = ext4_journal_current_handle();if (!IS_ERR(inode)) {init_special_inode(inode, inode->i_mode, rdev);inode->i_op = &ext4_special_inode_operations;err = ext4_add_nondir(handle, dentry, inode);if (!err && IS_DIRSYNC(dir))ext4_handle_sync(handle);}if (handle)ext4_journal_stop(handle);......}#define ext4_new_inode_start_handle(dir, mode, qstr, goal, owner, \type, nblocks) \__ext4_new_inode(NULL, (dir), (mode), (qstr), (goal), (owner), \0, (type), __LINE__, (nblocks))void init_special_inode(struct inode *inode, umode_t mode, dev_t rdev){inode->i_mode = mode;if (S_ISCHR(mode)) {inode->i_fop = &def_chr_fops;inode->i_rdev = rdev;} else if (S_ISBLK(mode)) {inode->i_fop = &def_blk_fops;inode->i_rdev = rdev;} else if (S_ISFIFO(mode))inode->i_fop = &pipefifo_fops;else if (S_ISSOCK(mode)); /* leave it no_open_fops */else......}
在ext4_mknod中,ext4_new_inode_start_handle会调用__ext4_new_inode,在ext4文件系统上真的创建一个文件,但是会调用init_special_inode,创建一个内存中特殊的inode,这个函数我们在字符设备文件中也遇到过,只不过当时inode的i_fop指向的是def_chr_fops,这次换成管道文件了,inode的i_fop变成指向pipefifo_fops,这一点和匿名管道是一样的。
这样,管道文件就创建完毕了。
接下来,要打开这个管道文件,我们还是会调用文件系统的open函数。还是沿着文件系统的调用方式,一路调用到pipefifo_fops的open函数,也就是fifo_open。
static int fifo_open(struct inode *inode, struct file *filp){struct pipe_inode_info *pipe;bool is_pipe = inode->i_sb->s_magic == PIPEFS_MAGIC;int ret;filp->f_version = 0;if (inode->i_pipe) {pipe = inode->i_pipe;pipe->files++;} else {pipe = alloc_pipe_info();pipe->files = 1;inode->i_pipe = pipe;spin_unlock(&inode->i_lock);}filp->private_data = pipe;filp->f_mode &= (FMODE_READ | FMODE_WRITE);switch (filp->f_mode) {case FMODE_READ:pipe->r_counter++;if (pipe->readers++ == 0)wake_up_partner(pipe);if (!is_pipe && !pipe->writers) {if ((filp->f_flags & O_NONBLOCK)) {filp->f_version = pipe->w_counter;} else {if (wait_for_partner(pipe, &pipe->w_counter))goto err_rd;}}break;case FMODE_WRITE:pipe->w_counter++;if (!pipe->writers++)wake_up_partner(pipe);if (!is_pipe && !pipe->readers) {if (wait_for_partner(pipe, &pipe->r_counter))goto err_wr;}break;case FMODE_READ | FMODE_WRITE:pipe->readers++;pipe->writers++;pipe->r_counter++;pipe->w_counter++;if (pipe->readers == 1 || pipe->writers == 1)wake_up_partner(pipe);break;......}......}
在fifo_open里面,创建pipe_inode_info,这一点和匿名管道也是一样的。这个结构里面有个成员是struct pipe_buffer *bufs。我们可以知道,所谓的命名管道,其实是也是内核里面的一串缓存。
接下来,对于命名管道的写入,我们还是会调用pipefifo_fops的pipe_write函数,向pipe_buffer里面写入数据。对于命名管道的读入,我们还是会调用pipefifo_fops的pipe_read,也就是从pipe_buffer里面读取数据。
总结时刻
无论是匿名管道,还是命名管道,在内核都是一个文件。只要是文件就要有一个inode。这里我们又用到了特殊inode、字符设备、块设备,其实都是这种特殊的inode。
在这种特殊的inode里面,file_operations指向管道特殊的pipefifo_fops,这个inode对应内存里面的缓存。
当我们用文件的open函数打开这个管道设备文件的时候,会调用pipefifo_fops里面的方法创建struct file结构,他的inode指向特殊的inode,也对应内存里面的缓存,file_operations也指向管道特殊的pipefifo_fops。
写入一个pipe就是从struct file结构找到缓存写入,读取一个pipe就是从struct file结构找到缓存读出。
课堂练习
上面创建匿名管道的程序,你一定要运行一下,然后试着通过strace查看自己写的程序的系统调用,以及直接在命令行使用匿名管道的系统调用,做一个比较。
欢迎留言和我分享你的疑惑和见解 ,也欢迎可以收藏本节内容,反复研读。你也可以把今天的内容分享给你的朋友,和他一起学习和进步。